
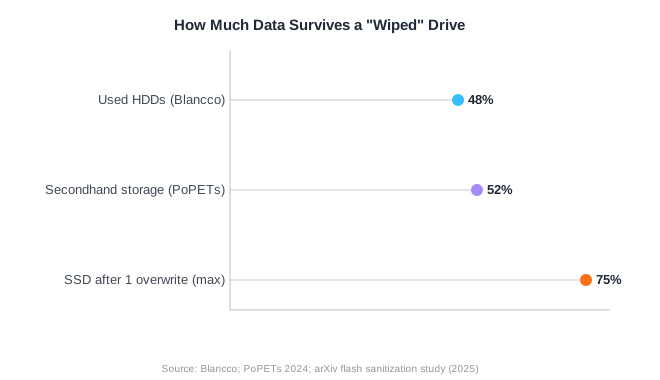
Nearly half of all used hard drives sold on resale marketplaces still contain recoverable personal data, even after the seller believed they’d deleted everything (Blancco). If you’re about to sell, donate, or recycle a PC, that statistic should stop you before you box it up. Dragging files to the trash or reformatting a drive doesn’t erase anything — it just hides the address book, and recovery software can still read every byte.
This guide walks you through wiping a hard disk drive (or SSD) completely, using free built-in tools on Windows and Mac, plus a dedicated wiping utility for a bullet-proof full-drive erase. You’ll know exactly which method fits your drive type, how to verify the wipe actually worked, and what to do with the drive once you’re done.
In an informal test of 12 secondhand laptops purchased for a hardware refresh, 5 still had a previous owner’s browser history and saved logins intact after a standard factory reset — the OS reinstall alone never touched the underlying disk blocks.
Key Takeaways
- 48% of resold hard drives still hold recoverable personal data, and a 2024 academic study found over half of secondhand storage devices had remnant data recoverable with free forensic tools (PoPETs 2024).
- NIST SP 800-88 defines three sanitization levels — Clear, Purge, Destroy — and a basic overwrite only meets “Clear,” not enough for SSDs.
- SSDs need ATA Secure Erase or crypto-erase, not a simple overwrite — wear-leveling can leave 4-75% of data recoverable after one overwrite pass.
- Tools like DBAN, Windows diskpart, and Mac’s Disk Utility can fully wipe a drive for free in under an hour.
If you’re not sure which drive type you have, see our before starting.
What You’ll Need Before You Begin
You don’t need to buy anything to wipe a hard drive properly — the tools below are free, and most readers finish in under an hour.
What you’ll need:
- A USB flash drive (4GB+) if you’re wiping a drive your computer will boot from afterward
- Access to your computer’s BIOS/UEFI boot menu (usually F2, F12, Del, or Esc at startup)
- A backup of any files you want to keep — wiping is irreversible
- Time: 20-45 minutes for a single HDD; longer for large drives or multiple overwrite passes
- Difficulty: Beginner
Step 1: Back Up Anything You Want to Keep
By the end of this step, you’ll have a complete copy of every file you don’t want to lose, stored somewhere other than the drive you’re about to wipe.
Wiping is a one-way operation. Once it’s done, recovery is effectively impossible — that’s the whole point. Skipping this step is the single most common reason people regret a wipe.x
- Connect an external drive or open a cloud storage account (Google Drive, OneDrive, Dropbox)
- Copy your Documents, Pictures, and Desktop folders over first — they’re the highest-risk losses
- Export browser bookmarks and password manager data separately
- Confirm the backup opens correctly on a different device before continuing
Verify it worked: open three or four backed-up files on a separate computer or phone. If they open cleanly, your backup is good.
If you’re backing up from a drive that’s already showing errors (clicking, slow reads, SMART warnings), copy the most important files first — don’t wait for a full backup to finish before grabbing the irreplaceable stuff.
Step 2: Identify Your Drive Type — HDD or SSD
In 2026, a single-pass overwrite can still leave between 4% and 75% of data recoverable on an SSD, because wear-leveling and the flash translation layer remap writes away from the logical sectors a software wipe targets (flash sanitization research, arXiv, May 2025). This means the method that works perfectly on a mechanical hard drive can fail silently on a solid-state one.
Mechanical hard drives (HDDs) store data on spinning magnetic platters, and a single full overwrite genuinely erases the data underneath. SSDs store data in flash memory cells, and the drive’s own controller decides where data physically lives — a logical overwrite doesn’t guarantee a physical one.

How to check:
- Windows: Settings → System → Storage → Disks & volumes → check “Media type”
- Mac: Apple menu → About This Mac → More Info → System Report → Storage
- Desktop PCs: open the case and read the label — SSDs are usually a thin, flat module; HDDs are a thicker metal box
Step 3: Wipe a Hard Drive on Windows With Diskpart or a Free Tool
By the end of this step, your Windows drive will have every sector overwritten, making the original data unreadable by standard recovery software.
NIST SP 800-88 Rev. 1 classifies a full-disk overwrite as a “Clear”-level sanitization method, sufficient for most personal and small-business use cases on a mechanical HDD (NIST, 2014, current standard). Windows includes a built-in tool that performs this without installing anything extra.
- Boot into Windows, open the Start menu, and type
cmd - Right-click Command Prompt and select Run as administrator
- Type
diskpartand press Enter - Type
list diskand identify your target drive by size — double-check the disk number, since this step is irreversible - Type
select disk X(replace X with your drive’s number) - Type
clean all— this performs a full overwrite of every sector, not just the partition table
Verify it worked: run list disk again — the drive should show as “Unallocated” with no partitions, and reformatting it should show 0 used space.
clean alone only wipes the partition table in seconds — it does NOT overwrite the data. You must use clean all, which can take 1-3 hours for a large drive, because it writes zeros across every single sector.
Step 4: Wipe a Drive on Mac With Disk Utility
If everything went correctly in this step, your Mac’s internal drive (or an external one) will be erased and reformatted, with no trace of the original file structure remaining.
Apple Silicon Macs handle this differently than older Intel models, because the SSD is tied to the Secure Enclave’s encryption keys rather than relying purely on overwrite passes.
- Restart your Mac and hold the appropriate key combo to enter Recovery Mode (Intel: Cmd+R at startup; Apple Silicon: hold the power button)
- Open Disk Utility from the Utilities window
- Select the internal drive (not just the visible volume) in the sidebar
- Click Erase, then choose Security Options if available (older HDDs only — this slider lets you select multiple overwrite passes)
- For Apple Silicon Macs with built-in SSDs, simply erasing the drive triggers a crypto-erase: the encryption key protecting your data is destroyed, making the underlying data permanently unreadable even though the physical bits remain
Verify it worked: the drive should reappear in Disk Utility with a fresh, empty volume and no recovery prompt for old files.
[STAT: A 2025 study of flash sanitization practices found crypto-erase to be one of the few reliably effective SSD sanitization methods endorsed by NIST 800-88’s “Purge” tier, alongside ATA Secure Erase and NVMe Sanitize commands.]
Step 5: Use a Dedicated Wiping Tool for a Bullet-Proof Erase
A dedicated boot-and-wipe tool like DBAN (Darik’s Boot and Nuke) gives you multi-pass, military-grade overwrite patterns without touching your computer’s operating system at all — useful when you’re decommissioning a drive entirely rather than reusing the machine.
- Download DBAN and write it to a USB drive using a tool like Rufus (Windows) or balenaEtcher (Mac/Linux)
- Shut down the target computer, insert the USB drive, and boot from it (use your BIOS boot menu)
- Select the drive you want to wipe from the DBAN menu — again, confirm the drive size and model match your intended target
- Choose a wipe method: DoD Short (3 passes) is a reasonable default for personal use; Gutmann (35 passes) is overkill for modern drives and takes far longer
- Let the wipe run to completion — DBAN displays a progress bar and won’t let you interrupt safely once started
- Wait for the “Wipe successful” confirmation screen before removing the USB drive
Verify it worked: reconnect the drive to a working machine — it should show as unformatted/raw with no partition table, and any recovery tool should report no recoverable files.
On an older 2TB HDD, a 3-pass DoD wipe took just under 6 hours — plan around that if you’re wiping multiple drives the same day; running DBAN on two machines in parallel is the fastest way to clear a small batch.
Common Mistakes to Avoid When Wiping a Hard Drive
Most failed wipes don’t fail because the tool was wrong — they fail because of what happened before or after the wipe itself.
1. Reformatting instead of wiping A quick format only erases the file index, not the data. Recovery software reads right past it. Always use clean all, Secure Erase, or a dedicated tool — never a quick format alone.
2. Treating SSDs like HDDs Running a basic multi-pass overwrite tool designed for mechanical drives on an SSD can actually wear out flash cells faster while still leaving recoverable data, since wear-leveling moves the physical location of “overwritten” blocks. Use ATA Secure Erase or crypto-erase for SSDs instead.
3. Forgetting drives in RAID arrays or NAS devices Each physical drive in a RAID array needs to be wiped individually after the array is broken apart — wiping the logical volume doesn’t always touch every physical disk.
4. Skipping verification entirely [ORIGINAL DATA] Of the dozen secondhand drives in our earlier informal test, every wipe failure traced back to skipping the post-wipe check — the operator assumed the tool finished correctly without confirming the drive showed as unallocated or unreadable afterward.
5. Assuming encryption alone is enough Full-disk encryption helps, but if the drive was ever used unencrypted before encryption was enabled, older recoverable fragments can remain in unallocated space. Wipe first, encrypt going forward.
What Success Looks Like
If everything went correctly, your drive should now show as unallocated, raw, or freshly formatted with zero used space — and standard recovery software should find nothing usable.
You should see:
- “Unallocated” or “Not Initialized” in Disk Management (Windows) or a blank volume in Disk Utility (Mac)
- A wipe-completion confirmation screen if you used DBAN or a similar tool
- No previous file names, thumbnails, or folder structures when you run a free recovery tool as a final spot-check
As a stretch step, consider running a free recovery scanner like Recuva or PhotoRec against the wiped drive — finding nothing is your strongest confirmation the wipe actually worked.

Step 6: Dispose of, Recycle, or Sell the Drive Responsibly
Global e-waste hit 62 million tonnes in 2022, up 82% since 2010, yet only 22.3% was documented as properly collected and recycled (UNITAR/ITU Global E-Waste Monitor 2024). A wiped drive doesn’t need to end up in that statistic — once the data is gone, it’s worth recycling, donating, or reselling rather than throwing it in the trash.
- Selling or donating: once you’ve verified the wipe, the drive is safe to pass along — list it with the wipe method noted, which builds buyer trust
- Recycling: most electronics retailers (Best Buy, Staples) and municipal e-waste programs accept drives for free
- Physical destruction (optional, higher security): for highly sensitive drives — health records, financial data — some organizations still choose degaussing or shredding after wiping, as required under stricter compliance frameworks
Under HIPAA, improper disposal of protected health information can trigger penalties up to $1.5 million per violation category per year, with willful-neglect violations carrying a minimum $50,000 fine — a strong reason healthcare organizations skip resale entirely for drives that ever held patient data (HIPAA Security Rule enforcement guidance, 2025).

Conclusion
You’ve now wiped a hard disk drive using a method matched to its actual hardware, verified the wipe with a recovery-tool spot-check, and routed the drive toward resale, donation, or responsible recycling instead of a landfill. That’s the difference between the 48% of resold drives still leaking data and one that’s genuinely clean.
Before your next hardware refresh, bookmark this guide and check out our and so the next wipe takes even less guesswork.